4/21/21
CSME members who are interested in DCC documentation for our layout can review this narrative. It is NOT a requirement to run on the layout, however, if there are problems, it can often help to define exact locations to assist in troubleshooting. This is written as the DCC wiring system is being designed and as of revision 4/21/21. Names and wiring assignments may change but we will try to keep documentation up to date.
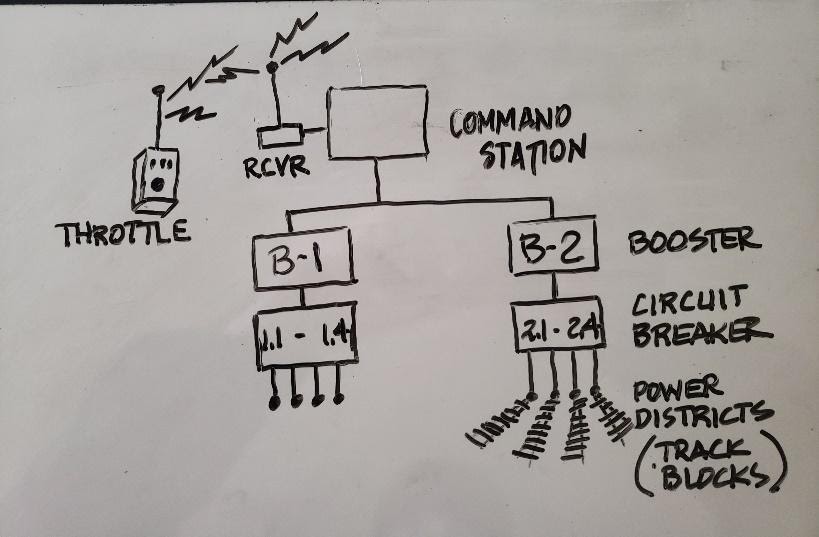
Here is a very simplified explanation of our DCC system. It has, among other components, the basic parts as shown in figure 1. We have a DCC command station that gets radio signals from our hand held throttles, processes them and sends commands to our 11 boosters. These boosters send information through (up to) 4 circuit breakers to sections of track called power districts. This information tells our trains to puff, toot, ding, back up, and go slow or fast. But how do we make sense out of all this stuff as it relates to our layout?
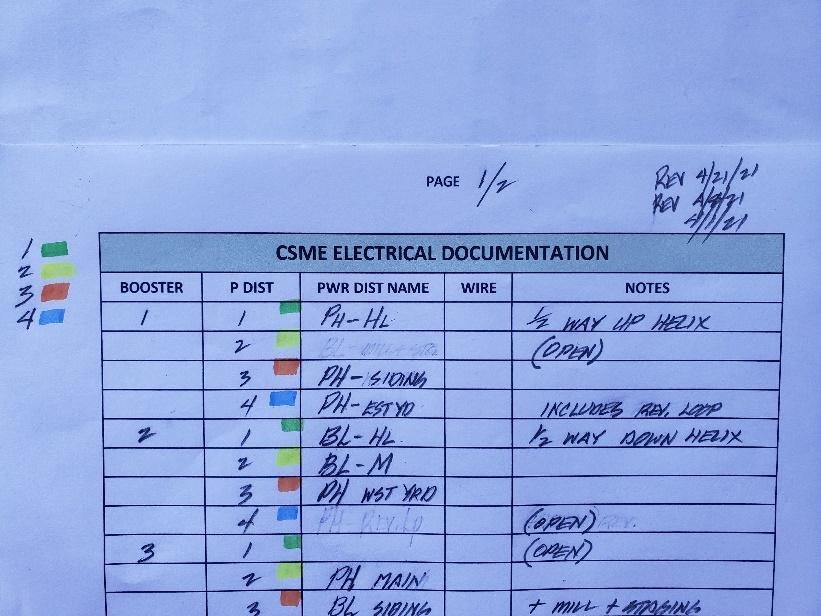
There are two pages that will help in understanding our DCC wiring: 1) A layout track plan labeled CSME as built schematic and 2) A chart labeled CSME Electrical Documentation. (Figures 4 and 5) The track plan uses a legend found on the 2nd page of the CSME Electrical Documentation. This legend indicates place name abbreviations on the track plan and other information. At this time these are working documents and are functional rather than neat and pretty. Some things to know about this documentation:
- It deals with booster, circuit breaker and power district levels in figure 1
- Place names use 2 letters (CO = Corvallis, C8 = Camp 8, etc.)
- Power districts use 2 numbers (8.2 = booster 8, power district 2)
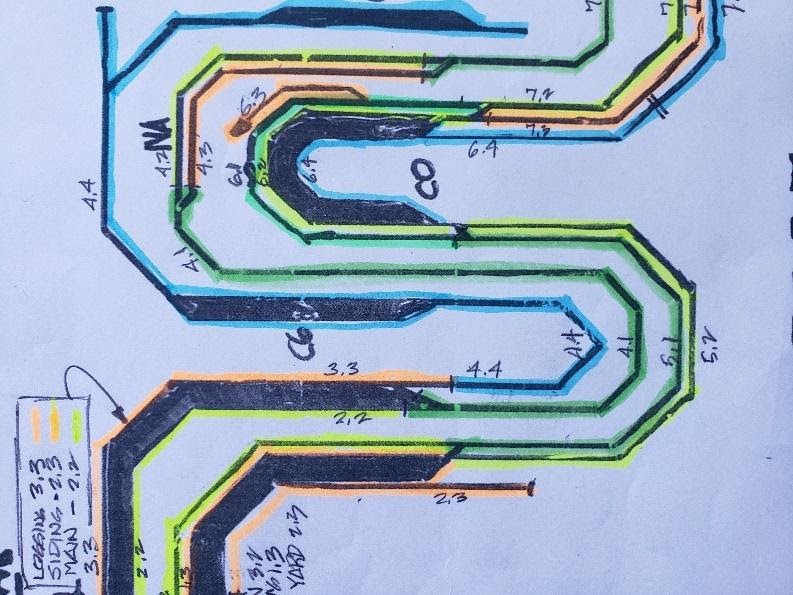
- 4 colors are used on the track plan to identify power districts: #1 = green, #2 = yellow, #3 = orange and #4 = blue. PLEASE NOTE: these DO NOT refer to wire color. These colors were hi-lighters used to make sure we had all tracks assigned.
- Each of our 10 boosters has 4 available power districts – 1 thru 4. We’re using the old Zephyr as a booster and it has 2 power districts – Z.1 and Z.2.
- Several power districts are un-assigned and are labeled “open”. These are purposely left un-assigned to provide balancing capability once we start running. For example, we may find that we are often tripping breaker 4.1 currently assigned to BL-NA. (Booster #4, power district #1 supplying power to the mainline between Blodgett and Nashville). Open power districts allow us to split a power district into 2 sections or re-assign it to another booster to balance capacity. It is difficult to predict where these overloads will occur because of the number of variables involved. We did a fair job of balancing power but an intense “run night” will show weak areas in the system. Open power districts allow us to respond and, after several sessions, we should have the system pretty well balanced.
- How do we predict where power districts should start and end? We base these points on several considerations including 1) how many locomotives will be using this track at one time, 2) are they pulling hard uphill, coasting downhill, or running level, 3) how many feet of track are in the power district, 4) how many feet of wire will it take to power the whole district including reaching back to the booster, 5) how many locomotives will be running on this same booster at one time and 6) the location of intuitive track blocks and insulated rail gaps.
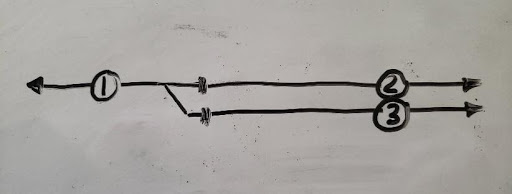
What the heck is an intuitive track block? Let’s take a look at figure 2. Numbers 1,2 and 3 define track blocks. Thick black marks indicate insulated rail gaps. 1 and 2 are mainline blocks and 3 can be a passing track. In terms of operability, a Gene Neville term, an eastbound (L to R) 4 unit set of powered, sound equipped F-7’s rolls thru block 2 followed by 4 powered, sound equipped SD-45’s in block 1. Meanwhile, in block 3 a set of 4 sound equipped, powered F-3’s move a westbound (R-L) train into the clear. In this situation, we could have 12 sound equipped, powered locomotives in these 3 blocks. We want our layout to be able to support this kind of operation. By blocking the track into mainline (1 and 2) and passing track (3) blocks with gaps near the fouling points of the switch, we can split power demands among boosters. The gaps make sense because that’s where trains would stop when given limited authority. This exact situation exists on our layout at the ends of Nashville and Eddyville.
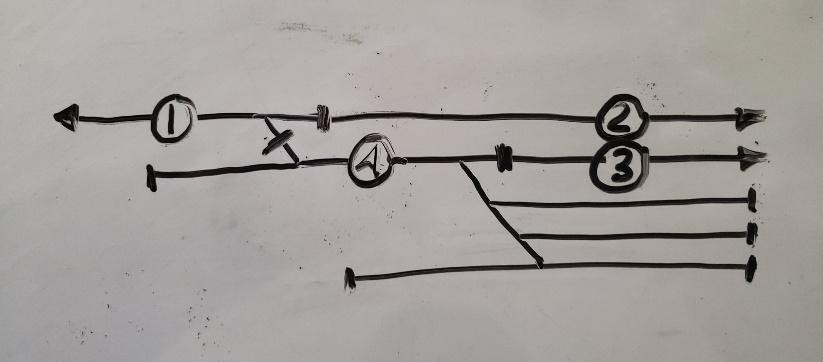
How about something more complicated? Check out figure 3 where we have a figure 2 situation complicated by a yard entrance. We shorten block 3 to stay clear of the yard ladder fouling point and add block 4 to power the yard. In terms of operability we can have 2 eastbound trains on the mainline in blocks 1 and 2, a westbound train easing up to the fouling point in block 3 and a switch engine working the ladder in block 4. If the switch engine or cars stumble on a switch in block 4 causing a short, it doesn’t shut down the mainline (1 & 2) or siding (3). This condition exists, sometimes with a double track mainline with crossovers, at the ends of Philomath, Corvallis and Toledo. Wow! We can see where dynamic balancing can be a bit tricky when we want a layout with prototypical options.
With a bit of study of this narrative, along with the documentation pages mentioned above and noted below in figures 4 and 5, one can go a long way in understanding our DCC wiring system. In addition, Randy, Gene, or myself would be glad to walk you through the system. It is not our aim to make each member a DCC aficionado but rather provide a basic understanding that will enable members to locate problem areas. The documentation package will be available in a binder near the command station when we get up and running. It is our hope that several folks will take an interest in the system and be able to help others keep it running. As old age creeps up on us, it will become more and more important to de-centralize this knowledge.
Figure 4 shows a small portion of the power district assignment sheet. This is the peninsula between Philomath (left) and Corvallis (right). Place names and power district assignments are as noted in numbers 2 and 3 above. Colors are explained in number 4 above. Note that lower level tracks are powered by boosters 1, 2, 5, 6 and 7. Upper level tracks are powered by boosters 2, 3, 4, and 7. By spreading the load across multiple boosters and power districts we can accommodate very intense train running . Figure 5 shows a portion of our Electrical Documentation chart. Columns are used as follows: Booster is the booster number, P Dist is the power district number (1 through 4), Pwr Dist Name is the location of the power district using 2 letter abbreviations. When final names are selected for the layout this column can be updated. Wire will be the colors of the wire pairs running from the circuit breaker to the power district. Notes include explanatory notes such as “includes rev. loop”.
It is hoped that interested members can use this documentation to understand the control system and thereby make it more manageable. At a minimum, an engineer can look at a blinking red light, identify the power district number, look it up in the documentation and report it to proper personnel.