12/30/20
The City Administrator of Adair Village stopped by the new club on 12/29/20. He was most impressed with the progress on our layout.
This additional 2020 post references the construction of the upper deck. We share this progress report in hope that it may come in handy on home layouts.
We will be using heavy shelf brackets in some areas of the upper level. They are metal and our layout is framed with plywood – how to make the connection AND keep a fairly exact dimension is the problem. We will do this in two steps. First we apply a wooden plate to the bracket as shown in figure 1. Notice that it has a rabbet and chamfer to clear the upturned end of the bracket. Second we set the bracket about 1/8” low and shim up to the proper level, figure 2.
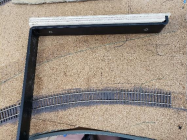
Figure 1: Wooden plate screwed to heavy metal bracket
Often times when supporting the upper level we have trouble cutting risers to the exact dimension we need. This is when we use a temporary adjustable riser. These are fairly simple as seen in figure 3. We make a 10 degree diagonal cut across the riser (dark line) and then slide the joint up or down as required. This allows us to frame to a pretty exact dimension. Once we’ve hit this dimension we clamp and screw pieces together. Alternately we can leave the temporary riser in place, mark the slip joint with a vertical line, apply Titebond 2 glue to the slip faces, match the lines and secure with an air powered finish nailer. As we connect new sub roadbed to existing sub-roadbed, making sure joints are straight and strong can be a challenge. We will be using ¾” plywood gusset plates below the sub-roadbed joints. They will lap as much as 8-12” on either side of the joint and be glued and screwed for strength. Figure 4.

Figure 2: Bracket in place, notice shims
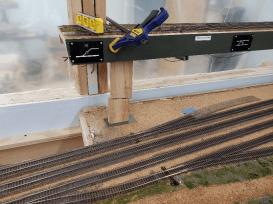
Figure 3:Temporary riser. This is the Blodgett piece above Philomath about where the old rock shed was on the high line.

Figure 4: Gusset plate extends out to the right just behind the clamp. Temporary riser is used to support plate while we run the screws in. Switch control panel is for the logging line crossover in Blodgett.
